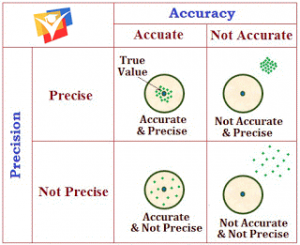
Precision:
All measurements, even when carried out with the utmost precision and care, involve errors. These errors may be associated with technical difficulties (the imperfection of the measuring instruments, the limited possibilities of the human eye, which in many cases takes readings of instruments etc.) and with numerous factors that are difficult or impossible to take into account (fluctuation of the surrounding temperature, the motion of air stream near a measuring instrument, vibrations of the measuring instrument together with the laboratory table). While investigating a physical law, various quantities involved therein have to be properly measured. Consequently, errors associated with the measurements of all the quantities interact with each other. In order to understand the role of these errors and to be able .to quote the findings of our investigations, we need to understand various types of errors and the ways in which these combine with each other. This has been achieved by developing a theory, called the theory of errors. Accuracy of Measurement:
While measuring a physical quantity, there is a limit to accuracy of measurement. The accuracy of measurement depends upon the number of digits up to which the value of a quantity is known. Therefore, it is necessary to use an appropriate number of digits to express reliability and accuracy. No purpose is served by writing additional digits and as such the final result is always expressed in terms of only those figures about which we are certain. We include only one additional figure in the last place about which we are uncertain.
Errors in Measurement:
While measuring any physical quantity, it is impossible in principle to find its true value. The difference between measured and the true values of a physical quantity is called the error of measurement. Following are the various types of errors.
(a) Systematic (or methodical) errors: These errors which tend to be in one direction (either positive or negative), arise on account of:
i) The short-coming of the measuring method used,
ii) The imperfection of the theory of the physical phenomenon which the quantity being measured relates to,
iii) Lack of accuracy of the formulae used for calculations.
For example, in weighing a body on a physical balance, the methodical error may be due to the fact that no account is taken of the difference in the buoyant forces exerted by the surrounding air on the body and on the weights.
Methodical errors can be reduced by:
i) Changing and improving the method of measurement,
ii) By applying correction to the formulae used for calculations
b) Instrumental errors: These errors are due to: (i) imperfection of the design and (ii) inaccurate manufacturing of the instruments. For example, the running of a stop watch may change due to changes in temperature or the center of the dial may not accurately coincide with the axis of rotation of its hands.
Obviously enough, whereas we can reduce the instrumental errors by using more accurate instruments, it is impossible to completely eliminate these errors.
c) Random errors: These errors which occur irregularly, arise due to a variety of factors which cannot be taken into account. In other words, random errors cannot be associated with any systematic or constant cause or with any definite law of action.
For example, the reading of a sensitive beam balance may be affected on account of the vibrations produced in the building due to the vehicles running down the street or by the settling of dust particles on the pans.
It is impossible to completely eliminate random errors. However, these errors can be reduced by repeating the measurements a large number of times. Obviously, the factors responsible for an increase and a decrease in the measuring results may partly compensate each other. Random errors are calculated on the basis of theory of probability by applying the Gaussian law of normal distribution. This law implies that the probability of an error (+ΔA) in a measurement of a quantity A is the same as the probability of an error (-ΔA) in that very measurement. Figure shows is the graphical representation of the law.
ABSOLUTE ERROR, MEAN ABSOLUTE ERROR, RELATIVE ERROR (OR PERCENTAGE ERROR):
a) Absolute error: Let a physical quantity A be measured n times and let A₁, A₂, …..An be the results of these measurements. If Am is the arithmetic mean of these measurements, then
\[{{A}_{m}}=\frac{{{A}_{1}}+{{A}_{2}}+…..{{A}_{i}}+…..+{{A}_{n}}}{n}\]
Or \[{{A}_{m}}=\frac{\sum\limits_{i=1}^{n}{{{A}_{i}}}}{n}\] … 1
Since the true value of the quantity is now known, we usually take Am to be the true value.
The magnitude of the deviation of the result of any measurement of the quantity from the arithmetic mean is called the absolute error of the measurement. Obviously, the absolute errors in the measurement of the quantity A are
ΔA₁ = |Am – A₁|
ΔA₂ = |Am – A₂|
….. ….. ….. ….
ΔAᵢ = |Am – Aᵢ|
ΔAn = |Am – An|
ΔA₁, ΔA₂, …..ΔAn represent the magnitudes and should always be taken as positive.
b) Mean absolute error: It is the arithmetic mean of all the absolute errors.
Clearly, Amean (mean absolute error)
\[=\frac{\Delta {{A}_{1}}+\Delta {{A}_{2}}+…..\Delta {{A}_{i}}+…..+\Delta {{A}_{n}}}{n}\]
Or \[\Delta {{A}_{mean}}=\frac{\sum\limits_{i=1}^{n}{\Delta {{A}_{i}}}}{n}\] … 2
ΔAmean is also called the final absolute error.
Thus, the final result of measuring physical quantity A is given in the form
A = Am ± ΔAmean … 3
This result implies that any single measurement of the quantity A is likely to be such that
Δm – ΔAmean ≤ A ≤ Am + ΔAmean … 4
c) Relative error or percentage error: The accuracy of measuring physical quantities is compared by calculating the relative error or the percentage error.
Relative error is the ratio of the mean absolute error to the mean value of the quantity being measured.
Thus, relative error = ΔAmean/Am … 5
Relative error expressed in percentage is known as the percentage error.
Thus, percentage error = ΔAmean/Am x 100% … 6
